- Building Machines In Code
- Building Machines in Code – Part 2
- Building Machines In Code – Part 3
- Building Machines In Code – Part 4
- Building Machines In Code – Part 5
- Building Machines In Code – Part 6
- Building Machines In Code – Part 7
- Building Machines In Code – Part 8
- Building Machines In Code – Part 9
Post Stastics
- This post has 4620 words.
- Estimated read time is 22.00 minute(s).

Creating the Tiny-P CPU
In this post, we will finally write some code. I promise! We’ll be using Python here as one of the most popular languages these days according to the Tiobe index, narrowly beating out C. So, in the interest of reaching as many people as possible I settled on Python for this post. However, I’ve written CPU emulators in C, C++, Pascal, ADA, PHP, Javascript, Dart, and various Assembly languages. I will present the concepts here in a generic form usable in any language. This means I may intentionally write less Pythonic code than normal in an effort to present the concepts in a more generic form.
For our first foray into simulating a system, we want to keep things simple. We will begin with a very basic CPU with a very simple architecture. In future posts, we will build more complex CPUs and systems. But, first, let’s get a good handle on the basics as it will be required for the more advanced topics.
The Tiny-P
The Tiny-P CPU contains just three registers. The Accumulator, Program Counter, and Instruction register. The Accumulator is the source of one of the operands fed into the ALU. It is also the destination for the results of most CPU operations. The PC or program counter simply stores the address of the currently executing instruction. The IR or instruction register stores the current instruction once fetched from program memory.
The Tiny-P is a Harvard Architecture CPU, it’s organization is shown in the diagram below:
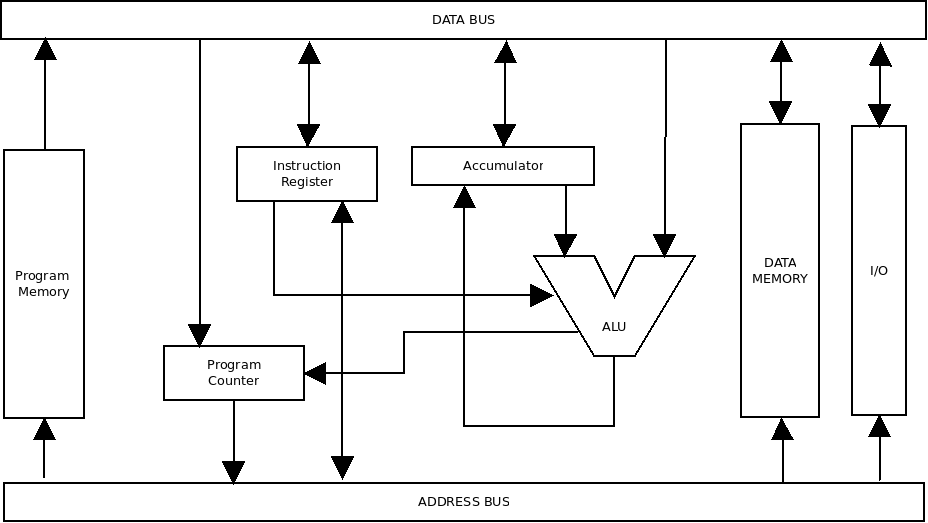
The first hint that this is a Harvard Architecture is the presence of two separate memories. One for the program and one for the data.
CPU STATUS
The Tiny-P CPU contains two status flags. These store information about the results of the last operation performed. Anytime a value is updated or stored in the accumulator, the status flags are set. The Branch instructions use these flags to determine if a branch should be taken. The two flags are P or Positive, which indicates the value in the accumulator is zero or positive, and Z or Zero, which indicates the value in the accumulator is zero. All arithmetic and logical operations set these flags according to their result.
Instruction Set Architecture
We’ve all heard that the computer instructions and data are just numbers. So how do these numbers control the CPU? Each instruction is composed of a few parts. First is the OpCode (Operation Code).
The opcode is used to tell the CPU what operation we wish to perform. The opcode can also be followed by data for the operation to be performed.
The Tiny-P CPU has a very simple instruction set shown in the table below:
| OPCODE | INSTRUCTION MNEMONIC | DESCRIPTION |
| 0 | NOP | No Operation |
| 1 | LDA 10 | Load the accumulator with the value stored in memory location 10 |
| 2 | STA 12 | Store the value of the accumulator in memory location 12 |
| 3 | AND 10 | AND the contents of Acc (accumulator) with the value stored in memory location 10. Then place the results back into ACC. |
| 4 | OR 12 | AND the contents of Acc (accumulator) with the value stored in memory location 10. Then place the results in Acc. |
| 5 | NOT | Perform a logical NOT (Invert) on Acc and store the results in Acc |
| 6 | ADD 10 | Add the value stored in memory location 10 to Acc and store the result in ACC. |
| 7 | SUB 12 | Subtract the value stored in memory location 12 and store the result in ACC. |
| 8 | BRZ 5 | Branch to program location 5 if the Zero flag is set. |
| 9 | BRP 7 | Branch to program location 7 if the value in ACC is zero or positive. |
To keep things simple, we will represent all opcodes and data in the Tiny-P CPU as decimal values. However, most modern text and CPUs represent their opcodes and data in binary or hexadecimal notation.
In the case of the Tiny-P CPU, the instruction is made up of 3 digits and ranges in value from 000 through 999. The instruction is decoded by partitioning it into its two constituent parts. The instructions for the Tiny-P use a simple encoding scheme where the left-most digit is the opcode and the remaining two digits on the right are used to provide data or address values. More modern CPU’s have multiple variable encoding schemes that are often many digits long and their meaning can depend on the current state of the CPU.
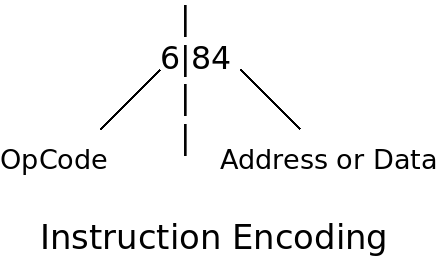
The table below decomposes several examples of Tiny-P instructions into their representative parts:
| INSTRUCTION | OPCODE | ADDRESS/DATA | |
| 000 | 0 | — | No Operation |
| 110 | 1 | 10 | Load Acc with the value stored in memory location 10 |
| 212 | 2 | 12 | Store the value in Acc in the memory location 12 |
| 500 | 5 | — | Perform a logical NOT operation in Acc. |
| 742 | 7 | 42 | Subtract the value stored at memory location 42 from Acc. |
| 855 | 8 | 55 | If the Z (zero) flag is set, branch to program location 55 |
Modeling the Tiny-P CPU
We now know enough to begin modeling our CPU. We know our CPU will repeat the Fetch-Decode-Execute cycle, it will contain 3 registers (ACC, PC, and Instruction Register), and it must decode the instruction into two parts, an opcode, and a possible address/data value. Given this information we can create a CPU class as demonstrated by the Python code below:
# @File: cpu.py

from time import time

class CPU:
    def __init__(self):
	self.acc = 0
	self.pc = 0
	self.instr = 0
	self.cycle_time_in_ms = 500
Next, we will create the memory our CPU will need to operate. Modeling simple memory is very easy. RAM is simply an array of cells. In Python, we use a list to model our memory. Add the code below to our CPU class:
    def init_rom(self):
	“””Initialize program memory to zero”””
	for i in range(self.MAX_MEM):
	    self.prog.insert(i, 0)

    def init_memory(self):
	“””Initialize data memory to zero”””
	for i in range(self.MAX_MEM):
	    self.mem.insert(i, 0)
In more complex systems we might want to model the memory as a separate class. For our simple CPU that is completely unnecessary. Instead, we will add our memory to the class initialization method as simple Python lists. We will need two memory arrays. One for the program memory and one for the data memory. Modify the __init__() method as follows:
    def __init__(self):
	self.MAX_MEM = 100
	self.acc = 0
	self.pc = 0
	self.instr = 0
        self.zero_flag = True
        self.pos_flag = True
	self.cycle_time_in_ms = 500
	self.prog = []
	self.mem = []
Our next task is to create methods to handle the instruction cycle’s fetch, decode, and execute cycles. Let’s start with the fetch cycle:
    def fetch(self):
        “””Fetch an instruction and increment the pc”””
	self.instr = self.read_prog(self.pc)
	self.pc += 1
The fetch method uses the program counter to index into the program memory array and obtains the proper instruction. Once the instruction is fetched the program counter is incremented to point to the next instruction.
Now that we have an instruction we need to decode it into the opcode and operand parts. We could use a couple of different approaches to decode the instruction. The simplest approach is simply checking if the instruction value is within a particular range. For example, an instruction value in the range of 0 to 99 would indicate that the instruction is a NOP or no operation instruction. If the instruction value is in the range of 100 to 199, then the instruction must be LDA or Load the Accumulator. The decoder code follows:
def decode(self):
    if self.instr in range(0, 100):
        self.opcode = 0
        self.operand = self.instr

    elif self.instr in range(100, 200):
        self.opcode = 1
        self.operand = self.instr – 100

    elif self.instr in range(200, 300):
        self.opcode = 2
        self.operand = self.instr – 200

    elif self.instr in range(300, 400):
        self.opcode = 3
        self.operand = self.instr – 300

    elif self.instr in range(400, 500):
        self.opcode = 4
        self.operand = self.instr – 400

    elif self.instr in range(500, 600):
        self.opcode = 5
        self.operand = self.instr – 500

    elif self.instr in range(600, 700):
        self.opcode = 6
        self.operand = self.instr – 600

    elif self.instr in range(700, 800):
        self.opcode = 7
        self.operand = self.instr – 700

    elif self.instr in range(800, 900):
        self.opcode = 8
        self.operand = self.instr – 800

    elif self.instr in range(900, 1000):
        self.opcode = 9
        self.operand = self.instr – 900

    else:
        raise ValueError("Undefined Opcode")
The decoder tests the instruction value to see if it fits within a particular range. If it does, the proper opcode is assigned and the range’s base value is subtracted from the instruction value to get the address/data value. If the instruction code does not fall within any expected range, a ValueError is raised. If you are adapting this code to other languages take note that the Python range function takes two parameters, “start” and “end”. The “end” parameter must be a value one larger than the last value to be tested. For example, given:
range(100, 200)
The values being tested for are 100 through 199.
Now we need to create methods to execute the instructions and add the appropriate calls to the corresponding sections of the decode method. To begin we will define each execution method with pass statement. Later we will come back and fill in each execution method. Add the following code to our CPU class:
    # Instruction execution methods
    def nop(self):
        pass

    def lda(self):
        pass

    def sta(self):
        pass

    def and_(self):
        pass

    def or_(self):
        pass

    def not_(self):
        pass

    def add(self):
        pass

    def sub(self):
        pass

    def brz(self):
        pass

    def brp(self):
        pass
Next, we need to call these methods from the decoder. Modify the decoder as follows:
        def decode(self):
        # Decode instruction value into opcode and address/data values
        if self.instr in range(0, 100, 1):
            self.opcode = 0
            self.operand = self.instr
            self.nop()

        elif self.instr in range(100, 200):
            self.opcode = 1
            self.operand = self.instr - 100
            self.lda()

        elif self.instr in range(200, 300):
            self.opcode = 2
            self.operand = self.instr - 200
            self.sta()

        elif self.instr in range(300, 400):
            self.opcode = 3
            self.operand = self.instr - 300
            self.and_()

        elif self.instr in range(400, 500):
            self.opcode = 4
            self.operand = self.instr - 400
            self.or_()

        elif self.instr in range(500, 600):
            self.opcode = 5
            self.operand = self.instr - 500
            self.not_()

        elif self.instr in range(600, 700):
            self.opcode = 6
            self.operand = self.instr - 600
            self.add()

        elif self.instr in range(700, 800):
            self.opcode = 7
            self.operand = self.instr - 700
            self.sub()

        elif self.instr in range(800, 900):
            self.opcode = 8
            self.operand = self.instr - 800
            self.brz()

        elif self.instr in range(900, 1000):
            self.opcode = 9
            self.operand = self.instr - 900
            self.brp()

        else:
            raise ValueError("Undefined Opcode")
Now it’s time to fill out the instruction execution methods we added earlier. We will begin with the nop method. This method doesn’t do any real work however, it does validate the opcode and raises a ValueError if it does not match. This test is really unneeded as we will only call the method from the decoder which has already validated the opcode value. However, if the method could be called from other code this check would be essential to ensuring the proper instruction was being executed.
    def nop(self):
        if not self.opcode == 0:
            raise ValueError(f"Illegal Opcode, expected: 0 got: {self.opcode}")
        return
Before moving on and completing all the execution methods I want to add a method that will allow us to exercise our code. At the moment we won’t be writing any formal test methods however, we will do that later. For the moment we want to keep things as simple as possible. So let’s just add a little code to allow us to run some methods as needed. Place the following code at the bottom of the cpu.py file and outside the CPU class:
…

if __name__ == '__main__':
    cpu = CPU()
    cpu.instr = 68
    cpu.decode()
    print(f’Opcode: {cpu.opcode}, Operand: {cpu.operand}’)
Now let’s run the code. The run should print out an opcode value of 0, and an operand value of 68, and exit without error. If you get any errors go back and compare your code to the code above or visit the GitHub repo and compare the file there (I’ll link to the repo at the end of the article).
Recall that we said the CPU, when powered on, goes through a reset phase to place the CPU in a known state to begin program execution. We will need a reset method to accomplish the reset. The reset method must:
- Set all registers to 0
- Set the Zero and Positive flags to true
- Optionally reinitialize the data memory
Let’s add the code for reset now. Place this code between the __init__() method and init_memory() method:
    def reset(self):
        self.acc = self.pc = self.instr = 0
        self.zero_flag = self.pos_flag = True
        self.init_memory()
Now let’s add a couple of housekeeping methods under the reset() method to aid in updating the accumulator and status flags. Place these methods just after the reset() method:
...

    def update_acc(self, value):
        self.acc = value
        self.update_status()

    def update_status(self):
        self.zero_flag = self.acc == 0
        self.pos_flag = self.acc >= 0
...
Next, we will need a few methods to help us manage program and data memory. Place the following code after the init_memory() method:
    ...

    def read_memory(self, address):
        # Return the value stored in memory at <address>
        return self.mem[address]

    def write_memory(self, address, value):
        # Write <value> to memory location <address>
        self.mem[address] = value

    def read_prog(self, address):
        # Return an instruction from ROM location <address>
        return self.prog[address]

    def program(self, address, value):
        # Program the ROM location <address> with the value <value>
        self.prog[address] = value

    def test_opcode(self, expected):
        if self.opcode != expected:
            raise ValueError(f"Illegal Opcode, expected: {expected} Got: {self.opcode}")
        return

    def test_operand(self):
        if self.operand >= 100:
            raise ValueError(f"Illegal Operand, expected: 0 - 99 Got: {self.operand}")
        return

    # Instruction Cycle methods
    ...
These methods are pretty self-explanatory except for the program method. This method is used to load a program into the program memory. Most fixed program computers store their programming in Read-Only Memory (ROM). In the real world, this ROM has to be programmed. This method emulates that process.
The test_opcode() simply tests if the expected opcode was set by the decoder and raises a ValueError if not. The test_operand() methods simply test if the operand is within the expected range and raises a ValueError if not.
Now that we have our utility methods in place we can begin completing the instruction execution methods we left unfinished earlier. We already completed the nop() method. Now let’s complete the lda() method.
The lda() method loads the accumulator with a value stored in memory at the address of the operand value. So when our decoder splits the opcode and operand, we use that operand as a memory address from which to fetch a value from memory. We will also continue to check our values and if they are not as expected we will raise an error. Modify the lda() method to read as follows:
    ...

    def lda(self):
        self.test_opcode(1)
        self.test_operand()
        self.update_acc(self.read_memory(self.operand))
The lda() method like most of our instruction execution methods is pretty simple. The method first makes a call to test_opcode() passing the opcode value for the LDA instruction. “test_opcode()” will then raise a ValueError if the desired opcode is not set by the decoder and return without error otherwise. Then a call to test_operand() is made to ensure that the operand is within the legal range. If not, a ValueError is raised, otherwise, the method returns without error. Next, update_acc() is called, passing in the desired value from data memory. This value will be placed in the accumulator and the update_acc() method will then set the status flags appropriately.
This same pattern of test values and then executing the desired operations will be followed for all instruction execution methods.
I want to test the LDA instruction code before moving on. To do this we need to change the code in our runner at the end of the file. Edit the code to read as follows:
...

if __name__ == '__main__':
    cpu = CPU()     # Create the CPU object

    # Test LDA
    cpu.init_rom()
    cpu.reset()     # Reset must be called before any memory access
    cpu.mem[2] = 7  # Store data to load into Accumulator
    cpu.program(0, 102)
    cpu.fetch()
    cpu.decode()

    print(f'Opcode: {cpu.opcode}, Operand: {cpu.operand}')
    print(f"ACC: {cpu.acc}, PC: {cpu.pc}, Z: {cpu.zero_flag}, P: {cpu.pos_flag}")
    print(cpu.mem)
As you can see, we first create the cpu object and then initialize the program ROM. Then we reset the CPU which initializes the data memory. Next we hack the data memory to store the value 7 into memory address 2. We will grab the value stored at address 2 and load it into the accumulator in just a moment.
First, we need to program the ROM with our instruction. The line cpu.program(0, 102) places the instruction LDA 2 into ROM at ROM address 0. Now we are ready to run the fetch, decode, execute cycle. We do this by calling cpu.fetch() to fetch the instruction from ROM. Next we call the decoder to decode the instruction with the line cpu.decode(). The decoder will dispatch the decoded instruction to the proper execution method, lda() in this case. Finally, we display the content of the CPU opcode and operand member variables and the accumulator and program counter along with the status flags.
If you run this code now you should get the following output:
Opcode: 1, Operand: 2
ACC: 7, PC: 1, Z: False, P: True
[0, 0, 7, 0, 0, 0, 0, 0, 0, 0, 0, 0, 0, 0, 0, ...

Process finished with exit code 0
If you got the correct output, great! If not, you’ll have to do a little debugging…
To make things easier, let’s move the code in the if-name-runner to a main function and call the main function from the if-name-runner. Edit the code to read as follows:
...


def main():
    cpu = CPU()     # Create the CPU object

    # Test LDA
    cpu.init_rom()
    cpu.reset()     # Reset must be called before any memory access
    cpu.mem[2] = 7  # Store data to load into Accumulator
    cpu.program(0, 102)
    cpu.fetch()
    cpu.decode()

    print(f'Opcode: {cpu.opcode}, Operand: {cpu.operand}')
    print(f"ACC: {cpu.acc}, PC: {cpu.pc}, Z: {cpu.zero_flag}, P: {cpu.pos_flag}")
    print(cpu.mem)


if __name__ == '__main__':
    main()
Now re-run the code just to make sure we didn’t break anything. This little change will make it easier to change our code to test each new instruction as we add them.
Ok, our next order of business is to complete the sta() instruction method. This instruction takes the value in the accumulator and stores it in the address provided by the operand. Revise the sta() method as shown below:
    ...

    def sta(self):
        # Store the of the ACC in memory location <operand>
        self.test_opcode(2)
        self.test_operand()
        self.write_memory(self.operand, self.acc)

    ...
Again, the method follows the typical pattern we used earlier.
Now modify the main() function as shown below:
...

def main():
    cpu = CPU()     # Create the CPU object

    # Test LDA
    cpu.init_rom()
    cpu.reset()     # Reset must be called before any memory access
    cpu.mem[2] = 7  # Store data to load into Accumulator
    cpu.program(0, 102)  # Program ROM (Program memory) location 0 to contain the LDA 2 instruction
    cpu.program(1, 201)  # Program ROM location 1 to contain the STA 1 instruction
    cpu.fetch()     # Fetch the first instruction at location 0
    cpu.decode()    # Decode and execute the instruction
    cpu.fetch()     # Fetch the instruction at location 1
    cpu.decode()    # Decode and execute the instruction

    # Display CPU and Memory
    print(f'Opcode: {cpu.opcode}, Operand: {cpu.operand}')
    print(f"ACC: {cpu.acc}, PC: {cpu.pc}, Z: {cpu.zero_flag}, P: {cpu.pos_flag}")
    print(cpu.mem)

...
Run the code. If all went well, the LDA instruction took the value 7 from memory address 2, and the STA instruction stored the value back in address 1. Ensure your output has a 7 in memory addresses 1 and 2.
Opcode: 2, Operand: 1
ACC: 7, PC: 2, Z: False, P: True
[0, 7, 7, 0, 0, 0, 0, 0, 0, 0, 0, 0, ...

Process finished with exit code 0
The next instruction in line for completion is the AND instruction. Rewrite the sta() method as shown below:
    ...


    def and_(self):
        # Logically AND the value in ACC and memory location <operand>
        # and place the results back in ACC, then set the status flags
        # accordingly
        self.test_opcode(3)
        self.test_operand()
        value = self.read_memory(self.operand)
        self.update_acc(self.acc & value)

    ...
Also, edit our main() function to read:
...


def main():
    cpu = CPU()     # Create the CPU object

    # Test LDA
    cpu.init_rom()
    cpu.reset()      # Reset must be called before any memory access
    cpu.mem[2] = 7   # Store data to load into Accumulator
    cpu.mem[3] = 10  # Store data to AND with Accumulator
    cpu.program(0, 102)  # Program ROM (Program memory) location 0 to contain the LDA 2 instruction
    cpu.program(1, 201)  # Program ROM location 1 to contain the STA 1 instruction
    cpu.program(2, 303)  # Program ROM location 2 to contain the AND 3 instruction
    cpu.fetch()   # Fetch the first instruction at location 0
    cpu.decode()  # Decode and execute the instruction
    cpu.fetch()   # Fetch the instruction at location 1
    cpu.decode()  # Decode and execute the instruction
    cpu.fetch()   # Fetch the instruction at location 2
    cpu.decode()  # Decode and execute the instruction

    # Display CPU and Memory
    print(f'Opcode: {cpu.opcode}, Operand: {cpu.operand}')
    print(f"ACC: {cpu.acc}, PC: {cpu.pc}, Z: {cpu.zero_flag}, P: {cpu.pos_flag}")
    print(cpu.mem)

...
Now run the code again. You should see that the accumulator contains the value 2 on exit and the memory location 3 contains the value 10. The 2 in the accumulator is a result of the accumulator’s previous value (7) being AND’d with the value from memory location 3 (10). I.e. 7 AND 10 = 2.
By now you should be getting familiar with how these functions are written. So, I won’t bore you with the implementation of the or_(), not_(), add(), and sub() instructions. You should try and figure them out yourself as an exercise. The last two instructions, however brz() and brp() are a bit different. So, I will cover them next.
The BRZ (Branch on Zero) and BRP (Branch on Positive) instruction operate on the PC (Program Counter). These instructions first check the CPU status flags and if the associated flag is set, the branch is taken by setting the pc to the operand value. The operand for these instructions is the address to jump to. Also, note that the flags are not altered so it is possible to do a calculation and perform several consecutive branches based on the results of that calculation.
Let’s see how to implement the BRP instruction. Modify the brp() as shown below:
    def brp(self):
        # IFF the last operation left the Zero flag set,
        # branch to program location <operand>. Note this
        # instruction does not alter any of the status flags.
        self.test_opcode(9)
        self.test_operand()
        if self.pos_flag:
            self.update_pc(self.operand)
As you can see from the code, the method simply tests the opcode and operand just as all the other instruction methods have done. Then it tests the state of the appropriate status flag. If the flag is set, the program counter is updated to the operand value. Otherwise, the function simply returns to the caller.
Let’s test it. We need to add the instruction to our program in ROM. Then add another call to fetch() and decode(). Make the modification to the main() function as follows:
...

def main():
    cpu = CPU()     # Create the CPU object

    # Test LDA
    cpu.init_rom()
    cpu.reset()      # Reset must be called before any memory access
    cpu.mem[2] = 7   # Store data to load into Accumulator
    cpu.mem[3] = 10  # Store data to AND with Accumulator
    cpu.program(0, 102)  # Program ROM (Program memory) location 0 to contain the LDA 2 instruction
    cpu.program(1, 201)  # Program ROM location 1 to contain the STA 1 instruction
    cpu.program(2, 303)  # Program ROM location 2 to contain the AND 3 instruction
    cpu.program(3, 900)  # Program ROM location 3 to contain the BRP 0 instruction
    cpu.fetch()   # Fetch the first instruction at location 0
    cpu.decode()  # Decode and execute the instruction
    cpu.fetch()   # Fetch the instruction at location 1
    cpu.decode()  # Decode and execute the instruction
    cpu.fetch()   # Fetch the instruction at location 2
    cpu.decode()  # Decode and execute the instruction
    cpu.fetch()  # Fetch the instruction at location 2
    cpu.decode()  # Decode and execute the instruction
...
Now run the code and you should see an output similar to:
Opcode: 9, Operand: 0
ACC: 2, PC: 0, Z: False, P: True
[0, 7, 7, 10, 0, 0, 0, 0, 0,

Process finished with exit code 0
The important part here is that you see the PC (Program Counter) has been reset to a zero value and that the ACC accumulator still contains the value 2, which is the result of the AND instruction before the branch. Also, the P status flag should be set to True. If all these conditions are true, then the branch code has worked as expected.
One issue we still have is that we have to make all these calls to fetch() and decode(). What we need is a method we can call to run the programs in program memory and continue running until halted. We can do this by adding a few new methods to the CPU class.
There are three features I want to add to the CPU. First, I want to be able to step through code a single instruction at a time. I also want to be able to halt the CPU execution. Also, we need to have a method to display the CPU registers, status, data, and program memory. Finally, we need a “Run” method that will allow us to simply run our programs.
Let’s start by adding a simple method to print some processor state. Create a new method in the CPU class named trace(), and fill it in as shown:
    ...
    def trace(self):
        # Display CPU and Memory
        print(f'Opcode: {self.opcode}, Operand: {self.operand}')
        print(f"ACC: {self.acc}, PC: {self.pc}, Z: {self.zero_flag}, P: {self.pos_flag}")
        print(f"ROM: {self.prog}")
        print(f"MEM: {self.mem}")
All this method does is print the processor registers, status flags, and program and data memory.
Next, we will add a step() method to allow stepping through instructions one at a time:
    ...
    def step(self):
        self.fetch()
        self.decode()
        if self.debug:
            self.trace()
Next, add the debug flag to the CPU __init__() method:
    ...
    def __init__(self):
        ...
        self.debug = False
    ...
Now remove all the calls to fetch() and decode() from the main() function. replace them with calls to step(). Set the debug flag to True after the program() calls. Then run the program and make sure everything works as expected.
Next, we will add the halt() and run() methods:
    ...
    def __init__(self):
        ...
        self.halted = False
        self.debug = False
        ...

    def run(self):
        while not self.halted:
            self.step()

    def halt(self):
        self.halted = True

    ...
Now replace the calls to step() in main() with a single call to run(). Now when you run the program it will continue to run.
We will add one more method to the CPU class. Many processors perform some additional functions when first powering on that they do not perform on a reset after power on. This start-up from power on is known as a Cold Start. A reset after power-on is known as a Warm Start. On a cold start, we want to clear the program memory, while on a warm start we only want to clear data memory. To accomplish this we only need to add a method to the CPU class to do the additional program memory initialization:
    ...

    def cold_start(self):
        self.init_rom()

    def reset(self):
        ...
Conclusion
Well, this has been a very long post. But after making you surfer through two installments with no code. I wanted to leave you with a workable application. This CPU is very basic but play around with it. Next time we will work on developing a few small programs for the Tiny-P.
Until next time, Happy Coding!
Resources
The code for this post can be found at: https://github.com/Monotoba/Building-Machines-In-Code.git