- Building Machines In Code
- Building Machines in Code – Part 2
- Building Machines In Code – Part 3
- Building Machines In Code – Part 4
- Building Machines In Code – Part 5
- Building Machines In Code – Part 6
- Building Machines In Code – Part 7
- Building Machines In Code – Part 8
- Building Machines In Code – Part 9
Post Stastics
- This post has 1972 words.
- Estimated read time is 9.39 minute(s).

Adding a Crude Console
Last time, we left off with a working computer system using the Tiny-T processor. I told you that we would add a very crude terminal to the system this time. The terminal I’ll present today is barely a terminal. It won’t have any special functions, text scrolling, or any other features we’ve come to expect from a modern terminal. It will only provide a test input and a text output. Our terminal is only meant to demonstrate the system’s I/O operations. So, let’s get started.
Begin by adding a new file to the project named console.py. We will need to import the sys module and our BusClient. Our class will have only four short methods:
#!/usr/bin/env python3
# -*- coding: utf-8 -*-
# File: console.py

import sys

from bus import BusClient


class Console(BusClient):
    BASE_ADDRESS = 0x00FE  # Read
    MAX_ADDRESS = 0x00FF   # Write

    def __init__(self, base_address: int = None, max_address: int = None):
        Console.BASE_ADDRESS = base_address if base_address is not None else 0x00FE
        Console.MAX_ADDRESS = max_address if max_address is not None else 0x00FF

    @staticmethod
    def should_respond(address, is_io_request=False):
        return Console.BASE_ADDRESS <= address <= Console.MAX_ADDRESS

    @staticmethod
    def read(address):
        if Console.should_respond(address):
            try:
                return ord(sys.stdin.buffer.read(1))
            except KeyboardInterrupt:
                pass
        return None

    @staticmethod
    def write(address, data):
        if Console.should_respond(address):

            char = chr(data & 0xFF)
            try:
                sys.stdout.write(char)
                sys.stdout.buffer.flush()
            except KeyboardInterrupt:
                pass


if __name__ == "__main__":
    console = Console(None, None)

    # Read the terminal window
    while True:
        ch = console.read(0x00FE)
        console.write(0x00FF, ch)
First, we have our class member variables BASE_ADDRESS and MAX_ADDRESS. These two values are used by should_respond() to determine if the console device is being addressed. Note that because these are class members (as opposed to instance members) we need to use the class name to access these values in the __init__() and should_respond() methods.
The read() method is a static method and it also accesses the should_respond() method. Because should_respond() is a static method have to use its class name anytime we access it in the class.
The read() method first checks to make sure the object is being addressed. If it is, then a single data byte representing an ASCII character is taken from stdin. The only thing that should interrupt this process is a keyboard interrupt exception, and so we wrap the stdin read operation in a try-except block. Since we want to deal with the characters as their numerical values, we wrap the read of stdin in a call to the ord() function which converts characters to their numerical values.
The write() method differs only slightly from the read() method above. In addition to taking in an address, it also receives a data value. This data value is masked to ensure it is no larger than 8 significant bits, or 255 in value. That value is then written to stdout. Again, only a keyboard interrupt should interrupt this operation.
Adding the Console to the Tiny-T System
Next, we need to edit our main.py file. Just below the line registering the RAM with the system bus, we need to add a line to create and register our console:
    ...
    # Create System Memory
    ram = Memory(32, 16)
    ram.clear()
    ram.set_location(0x000)

    # Register Memory on bus
    bus.register_handler(ram)

    # Terminal
    console = Console()
    bus.register_handler(console)

    ....
The Console class constructor allows for alternative BASE_ADDRESS and MAX_ADDRESS values to be passed in. This allows us to reuse the console in other systems or reconfigure our system so that the console resides at a different address.
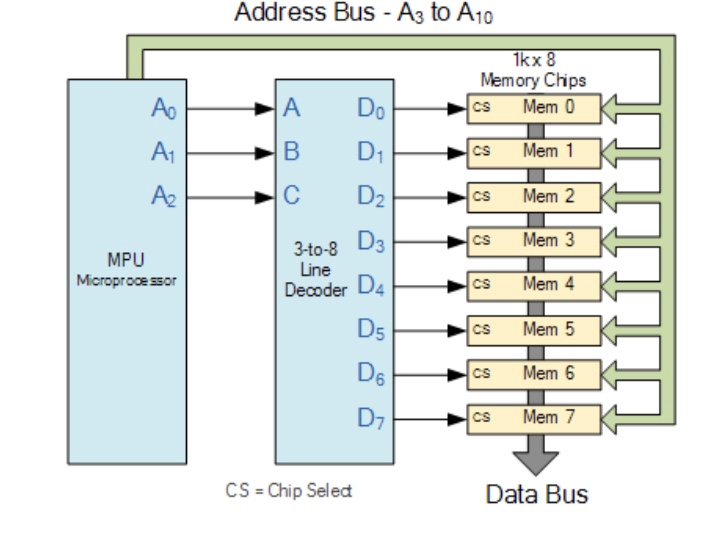
Address Decoding
In a real hardware system, address decoders are used to trigger device select and enable lines. These lines select which device will respond to the CPU’s read/write request. Our should_respond() method in our devices provides this decoding operation for us. By placing should_respond() in the device, however, we provide more flexibility than the hardware designer often has. Our devices can decode their own address range. In a real system, this would be done by a decoder circuit responsible for decoding the addresses of each device. Many systems from the 1970s to the 2000s used decoder ICs and an arrangement of logic gates such as the 7400, 7402, 7404, 74138, 74139, and 74154 to build a central address decoder circuit.
Memory address decoding hardware rarely decodes a specific address. Rather they often decode address ranges. This saves on hardware and timing delays. This often means, however, that a device can be found (mirrored) at multiple locations in the system. Our should_respond() method would need to be modified to handle such mirroring in systems requiring it. For the moment though, our simple approach keeps our code clean and approachable.
For the moment, we will stick with our simple I/O address decoding approach. Our code decodes the console’s read port address to be 0xFE. Recall the Tiny-T only allows I/O port numbers in the 8-bit range of 0 – 255. The console’s write port is located at address 0xFF. It is common for I/O devices to use separate addresses for reading and writing, though this is not always the case. Many devices use the R/W (read/write) line in the decoder to determine if the device’s input or output latch should be addressed. This allows for less decoding hardware and eases the cognitive load on the programmer. You can easily change the I/O port addresses of the console by passing in your own addresses to the Console constructor. Note however that our current implementation of the should_repsond() decoder method requires these addresses to be two consecutive addresses.
I found a great paper on the internet here: https://www.ece.mcmaster.ca/~shirani/dd04/memdecode by Dr. D. Capson at McMaster University, and I recommend you download and read it in preparation for more advanced projects in future posts. Other good “Real World” examples can be found in the hardware manuals of the Kim-1, Commodore C64, Tandy Color Computer, and other home computers from the 1970s and 1980s. Also, Engineer’s Notebook II: A Handbook of Integrated Circuit Applications, by Forrest Mims III, once sold by Tandy/Radio Shack is a great concise intro to digital electronics and includes an address decoder circuit and valuable information on digital logic in byte-size examples. You can find this book on the internet and sometimes copies come up for sale on eBay and Amazon.
Using Our Console
Now that we have our console connected to the system and located ad I/O port addresses 0xFE and 0xFF, we can begin to use it. Our first application of the console will be to echo back to the user whatever they type into the console. Our console uses STDIN and STDOUT which are standard streams, interconnected input and output communications channels between the computer program and its environment. These channels are set up by the operating system shortly after booting. There are three such streams: STDIN, STDOUT, and STDERR, or standard error which is provided for communicating program status (updates, progress, and failures) to the user. These streams can be redirected to files, programs, etc. In the case of our console, we simply tap into them to read and write data to them.
We will program our system with a short program to read the console input port at I/O port address 0xFE and write whatever we get back to the console output port located at I/O port address 0xFF. Edit the bottom of main.py to read as follows:
    ...
    # Terminal
    console = Console()
    bus.register_handler(console)

    # Instantiate CPU and attach to bus
    cpu = CPU(bus)

    # Program Console Echo
    cpu.write(0x0000, 0x1004)  # LDA (0x0004)
    cpu.write(0x0001, 0xF0FF)  # OUT
    cpu.write(0x0002, 0xE0FE)  # INP
    cpu.write(0x0003, 0xB001)  # BRA 0x000
    cpu.write(0x0004, 0x0041)  # DATA = 'A'

    # Run the program
    cpu.run()
The “Console Echo” program is written to memory using the CPU’s write() method. When the program is loaded we place an ASCII “A” in memory location 0x0004. You will find the ASCII decimal value of the capital “A” is 65 or 41 hexadecimal. The echo program then loads this value into the accumulator. Next, the contents of the accumulator are stored in the output register located at I/O port address 0xFF with the ‘OUT’ instruction. The console then writes this data to the terminal output which is our terminal screen. After this instruction executes you should see an ASCII “A” displayed in your host system’s terminal (assuming you ran the program from your host system’s terminal). Note that this may not work in your IDE’s output window!
Next, the echo program reads the console device’s output register located at I/O location 0xFE using the CPU’s “INP” instruction. This places the data read from stdin into the accumulator. Next, the echo program unconditionally branches to program address 0x0001, which contains our output instruction. The instruction once again writes the value in the accumulator (which now is whatever was read from the input stdin, into the console’s output causing it to be displayed.
What we end up with is a simple program that first prints an “A” and then loops waiting for input from the user. If the user enters any characters on the keyboard and presses Enter/Return, the keypresses are sent to stdin and read by the console to be sent to the CPU. Note that the characters stored in stdin are read one by one by the console. You may want to temporarily place a time.sleep(0.5) instruction at the bottom of the CPU’s step() method to slow things down so you can visually verify this.
Run this code and once you see the “A” in your display, type something on the keyboard and press the Enter/Return key. I typed “BCDEFR” and
 ABCDEF
 BCDEF
Conclusion
In this issue, we have implemented a very minimal console I/O device for our Tiny-T system. This is just a simple example to keep things approachable for now. Soon we will be developing much more complex systems as the basics learned here and now will be required to grok the material presented later.
I’d recommend that you read some material on digital logic, address decoding, and the hardware manuals for your favorite home computer from the 1970s or 1980s. These systems were much easier to understand and far less complex than a modern PC. Yet, at their core, the modern PC still possess everything these early systems did and still has the same basic functionality at their core.
For the next post, I’m torn between three possibilities:
- Moving on to a more complex CPU design
- Adding a more complex I/O device (like sound generation) to the Tiny-T system
- Adding a GUI (Graphical User Interface) to the Tiny-T
I’m trying to keep things simple for now and introduce each topic while our systems as a whole are still simple enough to easily understand. But I also don’t want to bore you with things you may already grasp. So, the next post will be a surprise! Even I don’t know yet what it will contain.
Resources
As always, the code for the Tiny-T system can be found on GitHub at: https://github.com/Monotoba/Building-Machines-In-Code
A PDF file of the Dr. D. Capson’s paper on address decoding can be downloaded from McMaster University at the following URL: https://www.ece.mcmaster.ca/~shirani/dd04/memdecode
Tutorials Point has a nice introduction to digital logic article at: https://www.tutorialspoint.com/digital_circuits/digital_circuits_logic_gates.htm